![](https://static.wixstatic.com/media/a89e08_ff8a3a333edc4b9f8cd1b950e7a81322~mv2.jpg/v1/fill/w_288,h_216,al_c,q_80,usm_0.66_1.00_0.01,blur_2,enc_auto/a89e08_ff8a3a333edc4b9f8cd1b950e7a81322~mv2.jpg)
Raised Bed Building Guide
The following instructions are to build a simple 8 foot long, 4 foot wide raised bed that is 12 inches high.
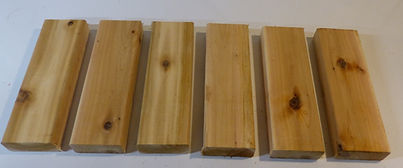
We use cedar lumber boards that are 1 inch thick, but you can use any type of wood (non-pressure treated) that fits your budget.
Step 1. Gather Your Supplies
![1"x12"x8' Cedar Board, quantity - 3](https://static.wixstatic.com/media/a89e08_691d1ad1631045779fd03a6559fecf23~mv2.jpg/v1/fill/w_147,h_110,al_c,q_80,usm_0.66_1.00_0.01,blur_2,enc_auto/a89e08_691d1ad1631045779fd03a6559fecf23~mv2.jpg)
![2"x4"x8' Cedar Board, quantity - 2](https://static.wixstatic.com/media/a89e08_bee3e77929494ac2a7a8d882584c1dff~mv2.jpg/v1/fill/w_147,h_110,al_c,q_80,usm_0.66_1.00_0.01,blur_2,enc_auto/a89e08_bee3e77929494ac2a7a8d882584c1dff~mv2.jpg)
![2" Exterior Screws, quantity - 1lb](https://static.wixstatic.com/media/a89e08_dee84b6af8aa4d7997835742567a98b3~mv2.jpg/v1/fill/w_147,h_110,al_c,q_80,usm_0.66_1.00_0.01,blur_2,enc_auto/a89e08_dee84b6af8aa4d7997835742567a98b3~mv2.jpg)
![1"x12"x8' Cedar Board, quantity - 3](https://static.wixstatic.com/media/a89e08_691d1ad1631045779fd03a6559fecf23~mv2.jpg/v1/fill/w_147,h_110,al_c,q_80,usm_0.66_1.00_0.01,blur_2,enc_auto/a89e08_691d1ad1631045779fd03a6559fecf23~mv2.jpg)
Step 2. Ensure You Have the Necessary Tools
![Circular or Hand Saw](https://static.wixstatic.com/media/a89e08_b74b02d3ed164e73bd2eb0727117d42d~mv2.jpg/v1/fill/w_147,h_103,al_c,q_80,usm_0.66_1.00_0.01,blur_2,enc_auto/a89e08_b74b02d3ed164e73bd2eb0727117d42d~mv2.jpg)
![Drill or Impact Driver](https://static.wixstatic.com/media/a89e08_e7f3fd628bd04d2aabe4d55a9ae398ea~mv2.jpg/v1/fill/w_147,h_110,al_c,q_80,usm_0.66_1.00_0.01,blur_2,enc_auto/a89e08_e7f3fd628bd04d2aabe4d55a9ae398ea~mv2.jpg)
![Measuring Tape](https://static.wixstatic.com/media/a89e08_392d15868e224859b023c7f26f4de75b~mv2.jpg/v1/fill/w_147,h_110,al_c,q_80,usm_0.66_1.00_0.01,blur_2,enc_auto/a89e08_392d15868e224859b023c7f26f4de75b~mv2.jpg)
![Circular or Hand Saw](https://static.wixstatic.com/media/a89e08_b74b02d3ed164e73bd2eb0727117d42d~mv2.jpg/v1/fill/w_147,h_103,al_c,q_80,usm_0.66_1.00_0.01,blur_2,enc_auto/a89e08_b74b02d3ed164e73bd2eb0727117d42d~mv2.jpg)
Step 3. Measure and Cut Your Boards
![boards.jpg](https://static.wixstatic.com/media/a89e08_f376cf328f15440795f0b831b1b6effd~mv2.jpg/v1/fill/w_100,h_42,al_c,q_80,usm_0.66_1.00_0.01,blur_2,enc_auto/boards.jpg)
-
Take one of the 1"x12"x8' boards and measure the halfway point. (It should be close to 4' in length).
-
Cut the 1"x12"x8' board in half, resulting in 2, 1"x12"x4' boards.
-
Take one of the 2"x4"x8' boards and measure 11 inches.
-
Cut at the 11" mark, and repeat, measuring and cutting 5 more times.
-
You will have 6, 2"x4"x11" boards, with some of the board left over. These are the braces.
Step 4. Attach the Braces
-
Take one of the 2"x4"x11" boards (brace), and place it underneath one end of a 1"x12"x8' board.
-
Attach the 2"x4"x11" brace to the 1"x12"x8' board using 6 screws.
-
On the other end of the 1"x12"x8' board attach another 2"x4"x11" brace.
-
Repeat this process for your other 1"x12"x8' board.
Step 5. Attach the Corners
![](https://static.wixstatic.com/media/a89e08_a71c684426d348aeb4b8b22959468745~mv2.jpg/v1/fill/w_219,h_219,q_90/a89e08_a71c684426d348aeb4b8b22959468745~mv2.jpg)
![](https://static.wixstatic.com/media/a89e08_e8a95b7c16134c738bfae8962011827b~mv2.jpg/v1/fill/w_219,h_219,q_90/a89e08_e8a95b7c16134c738bfae8962011827b~mv2.jpg)
![](https://static.wixstatic.com/media/a89e08_f1d02f08557142e19f0432c28d45bf37~mv2.jpg/v1/fill/w_219,h_219,q_90/a89e08_f1d02f08557142e19f0432c28d45bf37~mv2.jpg)
![](https://static.wixstatic.com/media/a89e08_6d003b1fd61d4be5a77b6a50a745c7a0~mv2.jpg/v1/fill/w_219,h_219,q_90/a89e08_6d003b1fd61d4be5a77b6a50a745c7a0~mv2.jpg)
-
Place the 1"x12"x8' board with the attached 2"x4"x11" brace upright.
-
Take one of your 1"x12"x4' boards and line up the edges to your braced board so it makes a corner. (image 1)
-
Attach the 1"x12"x4' board to the brace using 4 screws. (image 2)
-
Place your second 1"x12"x8' board upright and align next to the two boards you attached in steps 2 and 3. (image 3)
-
Attach this board to the 2"x4"x11" brace using 4 screws. You will now have 3 sides of your box completed. (image 4)
-
Take your second 1"x12"x4' board, and align it with the edges of the two 1"x12"x8' boards.
-
Attach this 1"x12"x4' board by screwing it into the 2"x4"x11" brace. Repeat on the other end. (image 5)
-
You now have a rectangular bed, 8 feet long and 4 feet wide. (image 6)
![](https://static.wixstatic.com/media/a89e08_64a3fde5737640bbb8bcb8d0288aeb59~mv2.jpg/v1/fill/w_219,h_219,q_90/a89e08_64a3fde5737640bbb8bcb8d0288aeb59~mv2.jpg)
![](https://static.wixstatic.com/media/a89e08_48638fcbd8a94ec388350629c9ecd041~mv2.jpg/v1/fill/w_219,h_219,q_90/a89e08_48638fcbd8a94ec388350629c9ecd041~mv2.jpg)
Step 6. Reinforce the Sides
![](https://static.wixstatic.com/media/a89e08_04297c4c446a42a3826e14c851fe3af3~mv2.jpg/v1/fill/w_219,h_219,q_90/a89e08_04297c4c446a42a3826e14c851fe3af3~mv2.jpg)
![](https://static.wixstatic.com/media/a89e08_ab298f9ee8474b9785e329f40e7dee8c~mv2.jpg/v1/fill/w_219,h_219,q_90/a89e08_ab298f9ee8474b9785e329f40e7dee8c~mv2.jpg)
![](https://static.wixstatic.com/media/a89e08_e0e3b137a0884dc6b11aee620ddf786f~mv2.jpg/v1/fill/w_219,h_219,q_90/a89e08_e0e3b137a0884dc6b11aee620ddf786f~mv2.jpg)
![](https://static.wixstatic.com/media/a89e08_f734a90308084b7fbe838c644bb9a42b~mv2.jpg/v1/fill/w_219,h_219,q_90/a89e08_f734a90308084b7fbe838c644bb9a42b~mv2.jpg)
![](https://static.wixstatic.com/media/a89e08_2806ca768c244703bb0175d36516cfcb~mv2.jpg/v1/fill/w_219,h_219,q_90/a89e08_2806ca768c244703bb0175d36516cfcb~mv2.jpg)
![](https://static.wixstatic.com/media/a89e08_f6872a59ccc54414abe584ded0f36f08~mv2.jpg/v1/fill/w_219,h_219,q_90/a89e08_f6872a59ccc54414abe584ded0f36f08~mv2.jpg)
To prevent the sides of your raised bed from bowing outwards, it needs to be reinforced.
-
Measure the midway point, (about 4 feet), of your 8' board.
-
Take one of your remaining 2"x4"x11" and attach it at this midway point using 6 screws. (image 1)
-
Take the other 2"x4"x8' board, align it with the 2"x4"x11" brace in the middle, and attach it using 2 screws. (image 2)
-
Using your last 2"x4"x11" brace, place it under the 2"x4"x8' board across from the other midway brace. (image 3)
-
Attach the 2"x4"x8' board to this brace using 2 screws. (image 4)
-
Using 6 screws, attach the 2"x4"x11" brace to the 1"x12"x8' board. (image 4)
-
Finally, cut off the excess of the middle 2"x4"x8' board. (image 5)
-
Your raised bed is now ready to be filled with soil. (image 6)